This document is used to following the receipt of funds from a Debtor (customer).
The Debtors key combined with a reference number constitutes the key for the Debtor Receipt document. The (accounting) Period also forms the key, enabling the same reference number to be re-used in different Periods.
*To correct a posting associated with a given Ref -> Without editing any previously entered details or selections, blank the Value field in the head of the document, followed by 'Post & Suggest. This will clear / reverse all previous entries, enabling correction.
Debtor Receipt Process
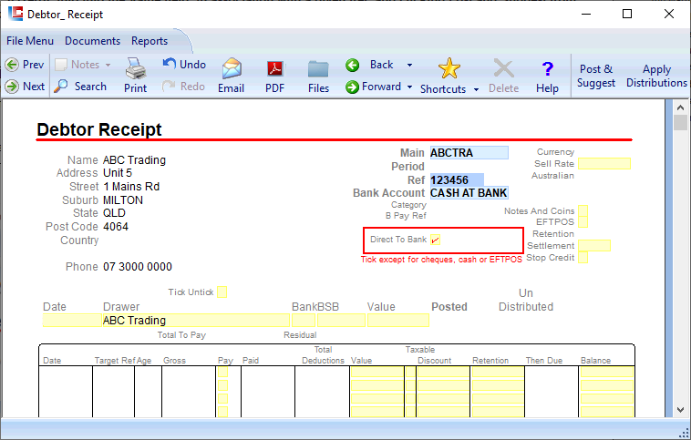
1. Select a Debtor from the 'Main' field.
2. In the eight character 'Ref' field enter a suitable reference, or remittance detail. The dark blue 'Ref' field is a key that is entered and may be recalled with F12 or a right mouse click, in a given Period. If the payment is by cheque the reference number should be the 6-digit cheque number. The 'Ref' will be displayed on the Debtor Statement.
3. Select the method Debtor funds were received.
- Direct To Bank -> BALANCE: CASH AT BANK: CURRENT: ASSET: Bank Balance Tick 'Direct To Bank' -> Postings to CASH AT BANK
- Cash -> BALANCE: DEPOSITS: CURRENT: ASSET: Cash Receipt Clearing Tick Notes and Coins (Leave 'Direct To Bank' blank) -> Postings to DEPOSITS
* If processed with 'Direct To Bank' blank, and neither 'EFTPOS' or 'Notes And Coins' ticked -> Postings will default to DEPOSITS
A single Value is associated with a Key (Main, Period, Ref) in the Debtor Receipt document. For example, if $200 is posted: - Re-posting $200 will have no effect - Re-posting $400 will post $400 (over-writing the previously posted $200). The total posting is $400, not $600. - Re-posting $0 will post $0 (over-writing the previously posted $200). The total posting is $0.
Page 2 Debtor Receipt
4. Enter the receipt amount in the Value field indicated below.
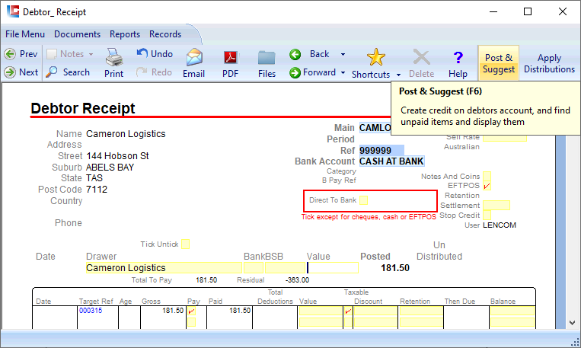
5. Clicking 'Post & Suggest' from the ribbon will post the Value amount to the selected (ticked) LILAC account. Simultaneously, the body of the document will populate with the invoice(s) ready for payment. Where a number of invoices exist, 'Post & Suggest' will suggest payment based on ageing. Particular invoices can be manually selected by un-ticking and ticking the Pay column. It is possible to part pay an invoice. 'Apply Distributions' from the ribbon is necessay to apply the posted value to selected Target Ref with the Pay tick.
The Residual field displays any value that is not yet distributed to an invoice.
You may toggle this tick to select the invoice(s) to which distributions are to be applied.
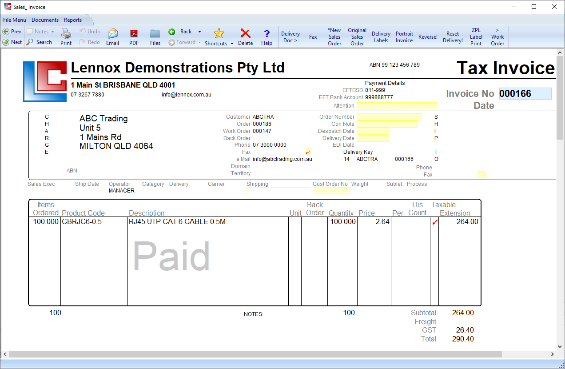
5. With the 'Value' applied correctly to Target Ref, click 'Apply Distributions' from the ribbon. This will mark the invoice(s) as PAID. The figure in the Value column will move to the Paid column. Posted values are now distributed to selected invoices.
Page 3 Debtor Receipt
Debtor Receipt Complete
If 'Direct To Bank' is ticked the accounting effect of this entry is a debit to BALANCE : CASH AT BANK, and a credit to the Debtors account. E.g the Debtors has transferred funds directly to BALANCE : CASH AT BANK.
If 'Direct To Bank' is unticked, the debit goes to the BALANCE : DEPOSITS account. Notes, coins, and cheques are received. Subsequently Documents > Debtors > Finalise Deposit may be used at the end of the day(s) receipting, (the time frame can be determined by the user) to generate a single credit for the total of the BALANCE : DEPOSITS account and a corresponding single (clearing) debit to CASH AT BANK, this batches notes, coins and cheque receipts. E.g Finalise Deposit is used to clear the BALANCE : DEPOSITS account, as the notes, coins, and cheques are taken to the Bank and deposited into the BALANCE : CASH AT BANK Account.
If 'Direct To Bank' is unticked, and 'EFTPOS' ticked, the debit goes to the BALANCE : DEPOSITS EFT account. Subsequently the Debtors > Finalise EFTPOS function should be used at the end of the day(s) banking to create a credit for the total of the BALANCE : DEPOSITS EFT account and a corresponding (clearing) debit to BALANCE : CASH AT BANK. E.g. Finalise EFTPOS is used to clear BALANCE : DEPOSITS EFT, as the Eftpos receipts are recognised as deposited into the BALANCE : CASH AT BANK Account.
Data on this line is used for the Bank Deposits report.
Note the residual amount unallocated amount here. A zero amount unallocated is conventional.
'Post & Suggest' and 'Apply Distributions' within the Debtor Receipt document will result in the invoice in question being marked as paid.
Page 4 Debtor Receipt
Debtor Receipt
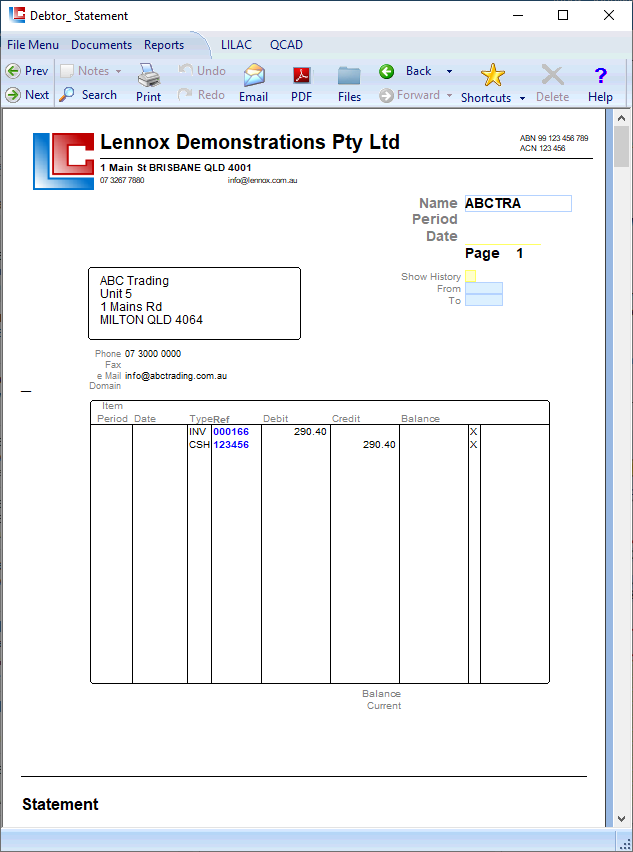
Debtor Statement
Completing the Debtor Receipt document will result in the Debtor Statement displaying - Invoice 000166; and Debtor Receipt Ref 123456; marked with an X, completed. The balance remaining is zero.
Page 5 Debtor Receipt
Debtor Receipt - Apply Discount
Usually a discount is applied to a Sales Order, (in the Sales Order Document), prior to invoicing. In circumstances where a discount is to be applied to an Invoice during the Debtor Receipt process, the following steps can be used.
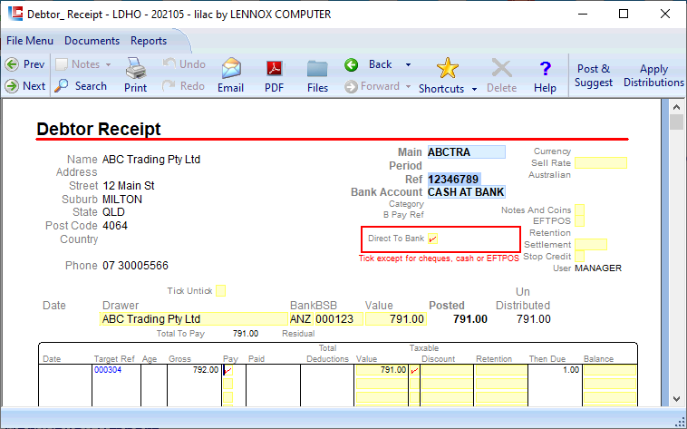
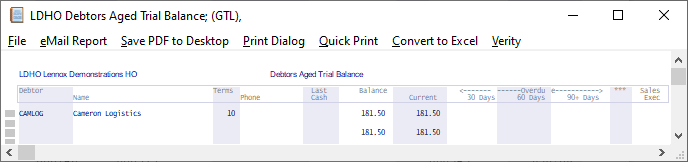
Reports > Debtors > Aged > Trial Balance, shows an outstanding invoice amount of $792.00. A $1 discount is to be applied during Debtor Receipt processing.
Documents > Debtor > Receipt
As the intention is to apply a $1 discount, enter $791 into the Value field in the head of the document. Click 'Post and Suggest' from the ribbon. This will result in a similar image to the above.
Now enter the discount $1 into the Discount column of the document. Click 'Apply Distributions' from the ribbon. This will present the following image.
Page 6 Debtor Receipt
Debtor Receipt - Apply Discount
After entering a $1 Discount and clicking 'Apply Distributions' from the ribbon, the discounted amount populates the Total Deductions column within the Debtor Receipt.
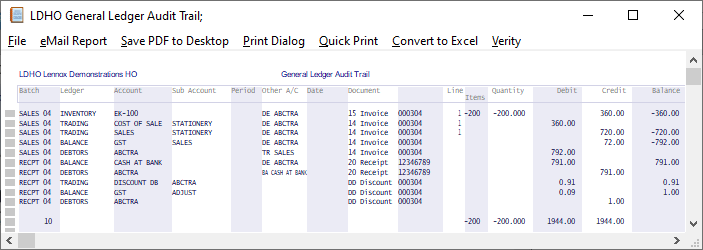
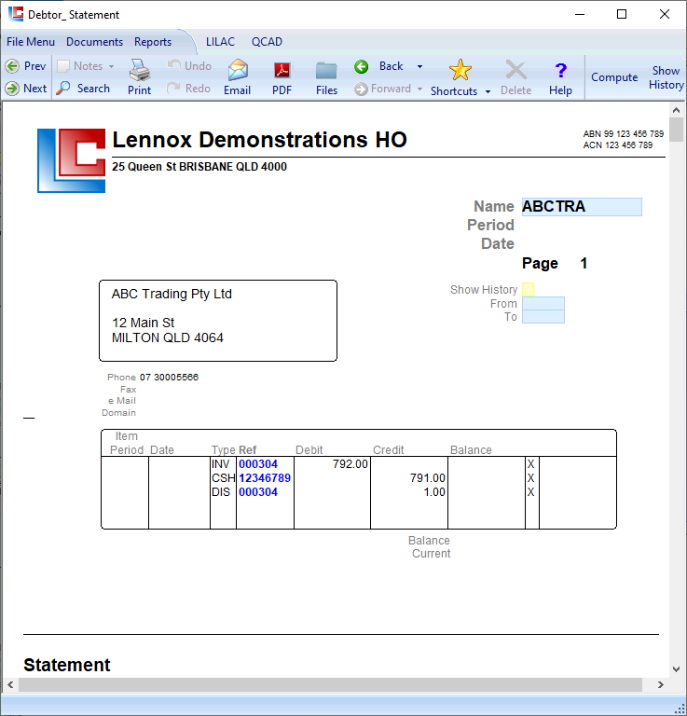
The Audit Trail and Debtor Statement show a discount posting to TRADING : DISCOUNT DB, (Direct Cost Settlement Discount).
Page 7 Debtor Receipt
Debtor Receipt - Apply Discount
Page 8 Debtor Receipt
Debtor Receipt - Reverse / Undo
To reverse a Debtor Receipt previously entered, all fields in the document should left as they were, then blank the Value field in the head of the Debtor Receipt document, and click 'Post & Suggest' from the ribbon. This will reverse / undo.
The example below illustrates this process. Whether or not the reversal relates to Direct To Bank (CASH AT BANK), Notes and Coins (DEPOSITS), or as in the below example EFTPOS (DEPOSITS EFT), the process of reversal is the same.
The correct debtor receipt may then be entered, or the balance left remaining on the account.
Example outstanding balance
*To remove the balance outstanding on the account, the Sales Invoice would be reversed. The Sales Order may also be deleted.
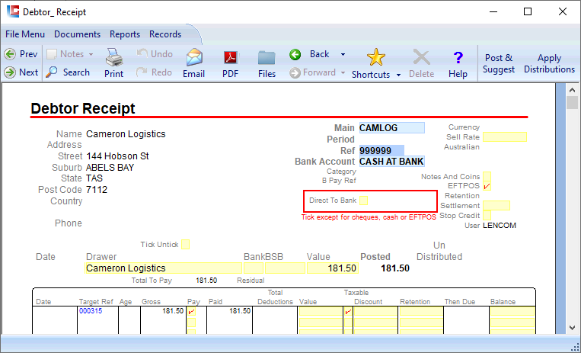
Example to be reversed
'Post & Suggest' and 'Apply Distributions' for $181.50 are applied to provide the example to be reversed.
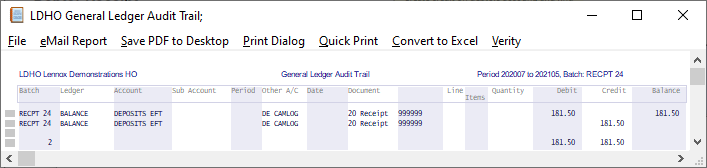
Audit Trail of the Debtor Receipt prcessed via EFTPOS
DEPOSITS EFT is debited, the CAMLOG account is credited.
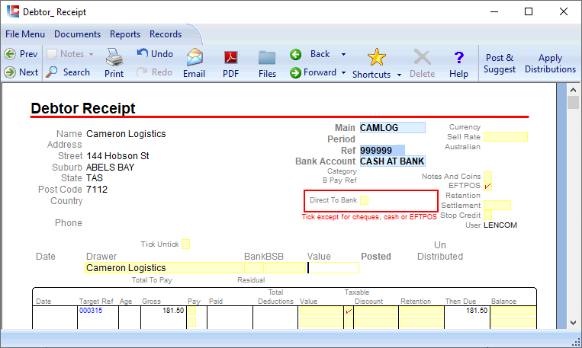
1. Blank the Value field in the head of the document and click 'Post and Suggest'
Page 9 Debtor Receipt
Debtor Receipt - Reverse / Undo
Reverse the existing Debtor Receipt by blanking the Value field in the head of the document. * LEAVING ALL OTHER FIELDS AS THEY WERE. Once reversed, the Debtor Receipt document may be modified with a corrected posting, or left with a balance.
Blank the Value field, and click 'Post & Suggest' from the ribbon.
The Debor Receipt is reversed and the balance is once again due.
Page 10 Debtor Receipt
Debtor Receipt
Purpose: This document provides the facility for receiving money and cheques from debtors. It also provides the ability to process zero valued receipts, which allow for the distribution of matching tax invoices and tax credits.
Prerequisites: A debtor must exist in the Lilac database, and that debtor must have been invoiced.
Context: After filling in the Main and the Ref field, clicking the Post & Suggest button (with the left mouse button) will fill in the appropriate fields. From here you can go through the value field and type in how much the debtor paid you. The Total to Pay field will automatically be updated with the sum of the amount entered into the Value field. Also the Then Due field will also be automatically updated. It will then be equal to gross amount owed minus the amount entered into the Value field. Use negative values in the Values field to post a credit to the Invoice.
After the correct details have been entered, click the Apply Distributions button (with the left mouse button), and amounts will automatically be adjusted based on the values that have been entered.
To correct an error, simply clear the amount entered for the value of the receipt and click the Post & Suggest button. Re-enter the correct value and click the Post & Suggest button to continue with Distribution.
Main: Type in the debtor key (or click the right mouse button) and select the key from the list. At this stage, the database is searched and details relating to the debtor are extracted from the Debtor Account. These are automatically entered into the appropriate boxes upon pressing the Enter key. Period: Accounting Period Ref: Type in the invoice number of the payment received, cheque number, (or equivalent). Bank Account: Type in the bank account that this amount should be debited. (eg: Cash at Bank) Category: The debtor category is automatically entered here upon entering the debtor key. Retention: This field is the total of the values of entered into the Retention fields below. Direct To Bank: Tick this box (with the left mouse button) if the debtor is paying straight into your bank account (eg: direct deposit). This can not be used in conjunction with EFTPOS field. Settlement: Settlement Discount Notes And Coins: Tick this box if the debtor is paying with cash. Stop Credit: Use this field to take a debtor off stop credit once a receipt has been processed. EFTPOS: Indicates that the receipt is from an Point of Sale machine. If this field is ticked, the posting will go to the Deposits EFT account. This can not be used in conjunction with Direct to Bank field. Date: Type in the date of the debtor receipt was received. This is set to the the working date. Drawer: Type in the drawer of the cheque. This field is automatically filled in with the name of the debtor as recorded in the debtor Master Record. Bank: Type in the bank of the debtor. This field is automatically filled in with the Bank of the debtor as recorded in the debtor Master Record. BSB: This field is automatically filled in with the BSB of the debtor as recorded in the debtor Master Record. Value: Type in the value of the receipt. Posted: The amount in the field will be updated when you click the Suggest button. The amount will be posted to the Deposits account in the Balance ledger, for the amount shown in the Value field. If you type in the incorrect Value, and Suggest, you will need to blank out the Value field and the click the Suggest button again. This will zero out the receipt, allowing you to start from the beginning. Un Distributed: The amount shown in this field is the value of receipt not yet distributed against a document or transaction. This is calculated by taking the Posted amount and subtracting the total of the Paid column. Total To Pay: The total amount of money to be paid is on this receipt. This is the total of the Value column. Residual: The difference between the Total to Pay field and the Value field.
Date: This column shows the original date the document was created. Target Ref: This column shows the reference number of the document. Age: This column displays the age of the original document in days. Gross: The original value of the document. Paid: The amount already paid for this invoice. Total Deductions: The sum of discount, and retention posted. Value: The amount being paid on this receipt for this document. If there is a discount which needs to be applied, you will need to enter in the discount before changing the value in this field. Taxable: If the original document was taxable, this field will be ticked. Discount: Type in a discount if applicable. If there is a discount, the discount should be entered before changing the Value field.
Page 11 Debtor Receipt
Debtor Receipt
Retention: This is the amount that is withheld from payment for the corresponding invoice. This feature is generally used when a invoicing company fails to quote their ABN number. Then Due: The balance still owing for the document after suggested distribution. Balance: Progressive Balance
Transaction Processing Button Description: Post & Suggest: Clicking the Post & Suggest button will post the Value of the receipt to the Deposits or the Deposits EFT Account. Apply Distributions: Clicking the Apply Distributions button will update the Paid and Total Deductions column, and the Un Distributed field.
From Here: After successfully completing this form, you can issue a Debtors - Statement, or run debtor reports such as Reports - Debtors - Aged Trial Balance.
When you are ready to do the banking, you should do a Debtor > Finalise Deposit, which will transfer the value from the Deposits account to the Bank Account specified.
Page 12 Debtor Receipt
Debtor Receipt - With more than 80 pages of invoice lines
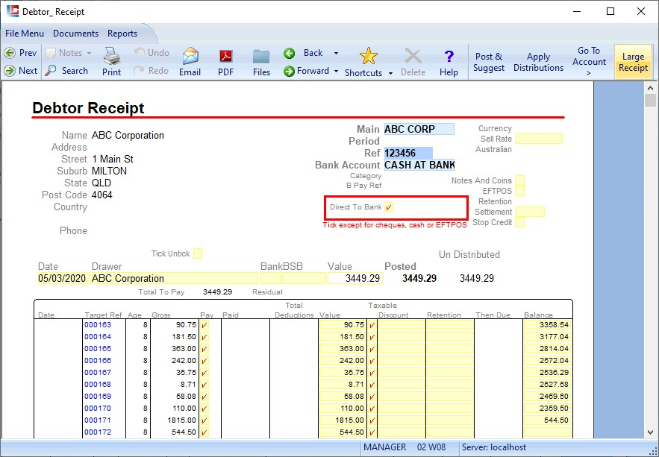
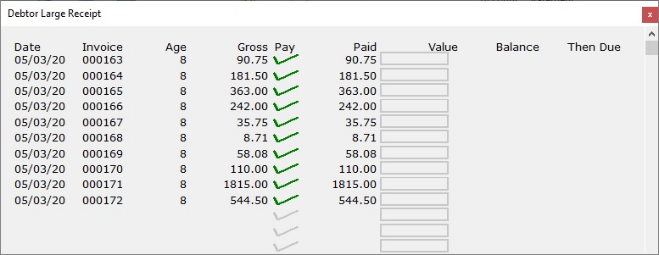
Where a Debtor Receipt document contains more than 80 pages of invoice lines, utilise the 'Large Receipt' botton from the ribbon.
The Debtor Large Receipt window is invoked from the ribbon. This window previews all invoices in a similar format to the Debtor Receipt document.
Use the Debtor Receipt document processing buttons as usual. Invoke 'Large Receipt' as necessary to review details, ie locate the last invoice and balance if beyond 80 pages.
Page 13 Debtor Receipt
Debtor Receipt - With more than 80 pages of invoice lines, continued
Page 14 Debtor Receipt
Debtor Receipt - With more than 80 pages of invoice lines, continued